Email Campaigns
Our email functionality allows admins to build and send an HTML-rich newsletter with full integration for formatted text, images, and custom hyperlink buttons. Emails can be saved as templates for easy reuse. When used in conjunction with distribution lists and Smart Lists, admins can send trackable communication to their entire group or easily tailor their message to target a specific set of recipients.
If you need to purchase additional email credits, click here.
Browse the documentation below or click to jump to a topic:
Create an email campaign
Use a Smart List
Manage and track emails
If you need to purchase additional email credits, click here.
Browse the documentation below or click to jump to a topic:
Create an email campaign
Use a Smart List
Manage and track emails
How to Create an Email
Add Basic Information
- On the left navigation bar, hover over Emails, then in the submenu, click on Send an Email
- The platform has six steps to detail the entire process of creating and sending an email campaign.
Add Basic Information
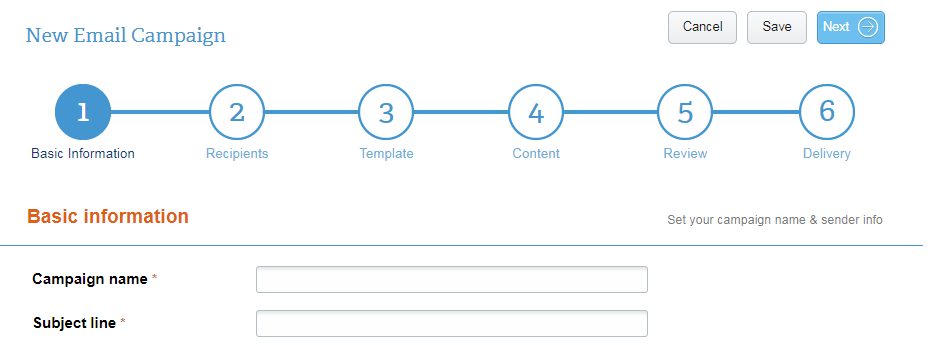
Fill out the required basic information fields, then click Next.
Campaign Name refers to the title by which you’ll refer to this email in your records. It only shows up in your Manage Emails tab under this name, which is not visible to members. Sender address will auto-populate if you’ve previously entered this information in the member info tab.
Note: The address entered in this section will automatically appear in the lower left corner of your email. You are legally required to include a valid physical postal address.
Select Email Recipients
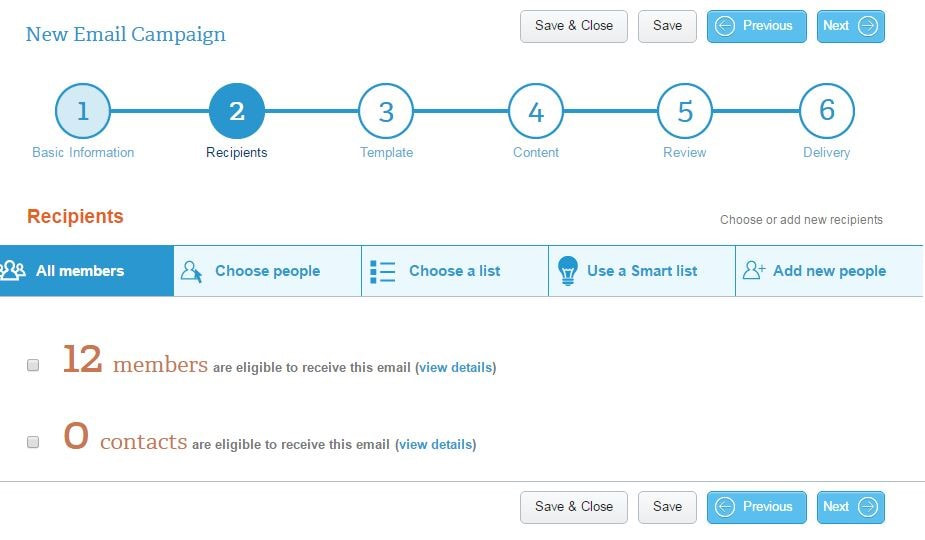
Admins can choose to send emails to all members and/or contacts. Moreover, you can send to specific group members, add new recipients manually, or from a previously-created distribution list, all with only a few clicks.
There are different ways to add recipients:
Use a Smart List
Select all members
Select individual members or contacts
Select a distribution list
Add new people
Note: Email credits do not roll over to the next month.
There are different ways to add recipients:
Use a Smart List
Select all members
Select individual members or contacts
Select a distribution list
Add new people
Note: Email credits do not roll over to the next month.
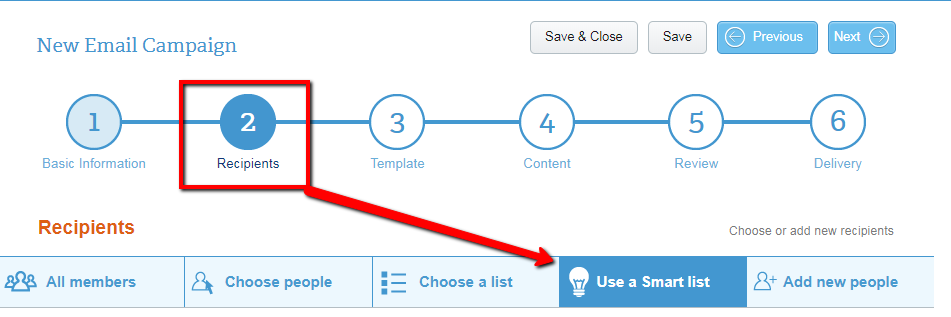
Use a Smart List
A Smart List is a distribution list populated by dynamic queries based on member actions and statuses. For example, Smart Lists can be created based on a group’s member levels, or those who’ve RSVP’d to an event.
A Smart List is a distribution list populated by dynamic queries based on member actions and statuses. For example, Smart Lists can be created based on a group’s member levels, or those who’ve RSVP’d to an event.
- In Step 2. Recipients of building your email campaign, select Use a Smart List
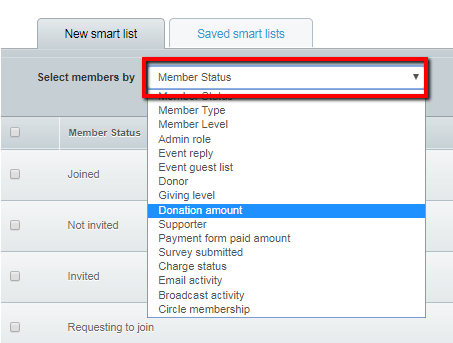
2. Click the Select Members By dropdown menu and choose a category
3. Choose a list of recipients from the list(s) that appears
Note: Depending on the Smart List you wish to create, you’ll select the criteria of the list. For example, a Smart List based on email activity has the option to include members who clicked within or opened an email. If the list is based on donors, you’ll select from the options of donor amount, a specific giving level, or all donors. You will have the option to view members.
To save the Smart List for future use, select the Add this to My Saved Smart Lists checkbox and name your list.
Other options for choosing recipients:
Choose a Template and Add Content
- All Members: Select to send to all your members, contacts, or both in one click.
- Choose People: Select individual members or contacts from your group.
- Choose a List: Select a distribution list you’ve previously created. (Learn how to create a distribution list.)
- Add New People: Enter new people not otherwise associated with your group. They can be added individually, or uploaded from a separate email list.
Choose a Template and Add Content
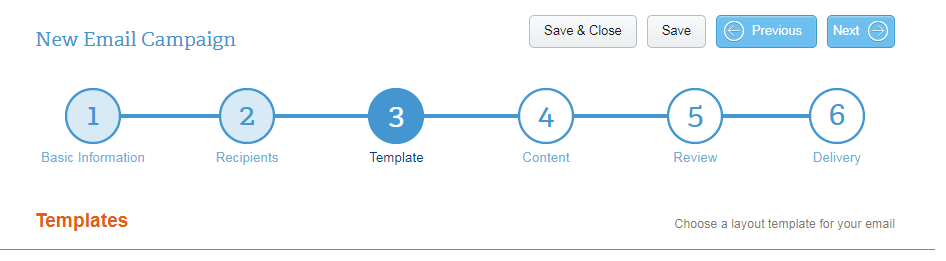
Templates will help you create an attractive email that is fully customizable with HTML content, buttons, and personalized elements. The template options are displayed in a filterable list.
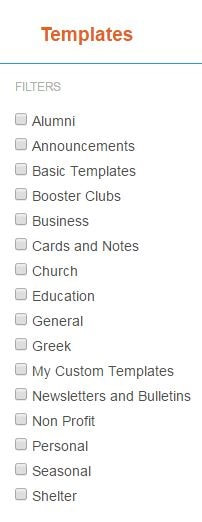
- Select the other pre-designed templates to build email that most closely aligns with your email goal. You can filter templates by organization, such as Greek, Church, or Nonprofit among others, to quickly access relevant templates.
- Select Basic Templates to craft an email with the least amount of pre-built design, so you can fully customize your email with tables.
Add Content
You can customize your content within the confines of your chosen email template.
- Click inside the template window to bring up the Editor Tool
- Use the editor to add your content
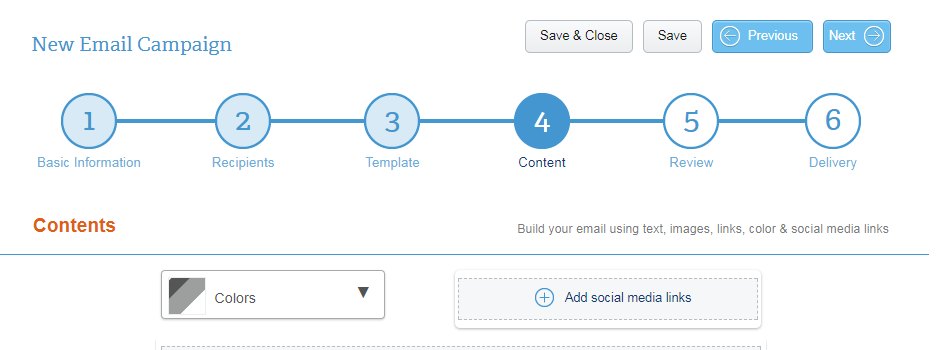
There are also six pre-programmed buttons that allow you to insert information from other sections of your group:
Images: Upload an image from your PC. (580 pixels)
Personalized Text: From the dropdown menu, select how you’d like to address your recipients. All information, such as name and email address, is pulled from membership data. This allows each recipient’s email to appear directed specifically to them without sending one to each person.
Buttons: These are one-click elements for recipients to reach your payment forms, Donation Sites, surveys, and the join-the-group process.
Note: Only one button can be added per email.
Documents: If you’ve linked your group to a Box.com account, you can attach documents as files using this feature.
Form Data: Personalize your email campaign by using the recipient’s answers to a question from one of your forms.
Review and Determine Delivery
Images: Upload an image from your PC. (580 pixels)
Personalized Text: From the dropdown menu, select how you’d like to address your recipients. All information, such as name and email address, is pulled from membership data. This allows each recipient’s email to appear directed specifically to them without sending one to each person.
Buttons: These are one-click elements for recipients to reach your payment forms, Donation Sites, surveys, and the join-the-group process.
Note: Only one button can be added per email.
Documents: If you’ve linked your group to a Box.com account, you can attach documents as files using this feature.
Form Data: Personalize your email campaign by using the recipient’s answers to a question from one of your forms.
- Click on Add Follow Us Links at bottom of the email window to add social media links that allow members to easily follow your group on your preferred platforms
- Click on Add Social Media links at the top of the email window to enable sharing by members on the selected platform
- Select Add Banner Image (580 pixels) to include a specific image for your email
- For example, the image you use for your group page.
Review and Determine Delivery
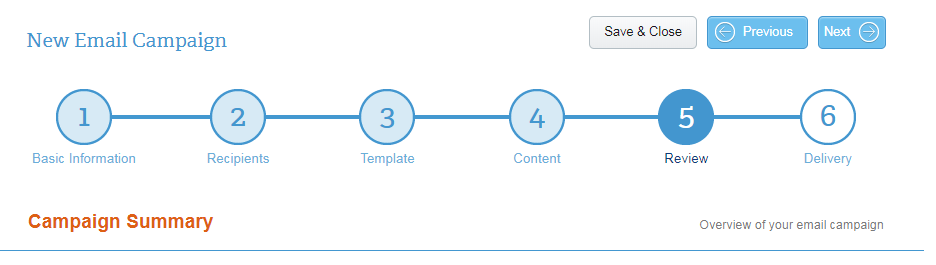
Once you have created your email, review to ensure all the elements, such as recipients and links to social sites, were successfully added.
Click the Save This Email as a Template button if you’d like to reuse the design. Next time you send an email, all you’ll have to do is update any content changes.
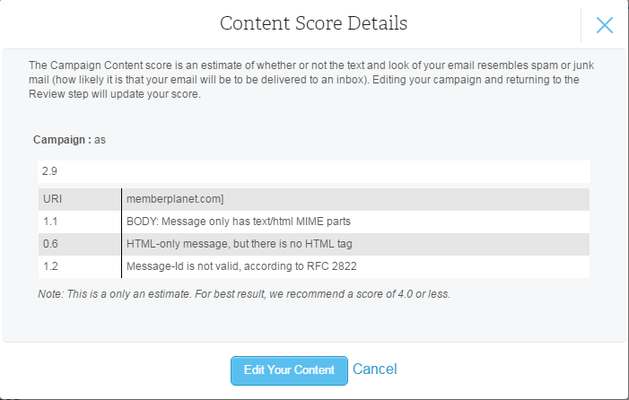
Campaign Score: Use this tool to estimate whether or not the text and look of your email resembles spam or junk mail. We recommend a score of 4.0 or less to minimize likelihood your email isn’t delivered properly.
Click the Save This Email as a Template button if you’d like to reuse the design. Next time you send an email, all you’ll have to do is update any content changes.
Campaign Score: Use this tool to estimate whether or not the text and look of your email resembles spam or junk mail. We recommend a score of 4.0 or less to minimize likelihood your email isn’t delivered properly.

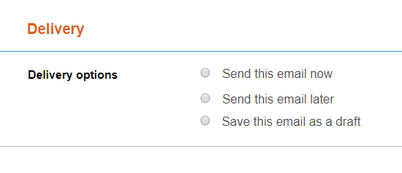
Determine Delivery
- Choose one of the delivery options:
- Send this email now
- Send this email later
- If you opt to send your email at a later date:
Note: To select multiple date and times, click the checkbox and enter the remaining dates and times.
- Save this email as a draft
3. Click Finish to complete your email creation process
Advanced Email Techniques
These more advanced functions allow for enhanced customization, coding, and testing techniques using HTML, to make the most of the platform’s email functionality for your group.
How to use tables
If working within a template doesn’t suit your needs, an email can be built completely from scratch. Tables allow admins to create an email purely from their own vision. Building through tables is a highly specific task, therefore these instructions will take you through some vital elements in each step of the process in general. This is not intended to encompass all options available.
- Select a basic template
- Delete the basic information from the template
- Click inside the email window to bring up the editor toolset
- Click on the table icon in the editor toolset
- Decide how many rows and columns you want in your email

Best practices:
How to use borders
Creating a border around your email isn’t required, however it does give your email a frame that increases its professional appearance.
To create a border, simply add another column and row to your table. For example, a 3x3 table will become a 4x4 table to incorporate a border.
To add color to your border, right click on each cell, select Cell Properties and change color.
- Set your table width to 580 pixels regardless of the content you’ll be adding. This will prevent any of your text from bumping against the outermost edge of the email.
- Enter the width of your center column to ensure your other column’s content doesn’t run into each other.
How to use borders
Creating a border around your email isn’t required, however it does give your email a frame that increases its professional appearance.
To create a border, simply add another column and row to your table. For example, a 3x3 table will become a 4x4 table to incorporate a border.
To add color to your border, right click on each cell, select Cell Properties and change color.
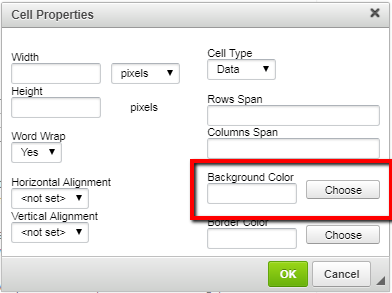
Note: Colors can be set using RGB or the hex code.
Best practice: If using a border, it’s a good idea to also add a padding column and row to your table. This should be set at 10 pixels. This padding will ensure your images and text don’t run into the border edges to create a visual mess.
How to use columns/additional tables
You can continue to modify the design of your email by adding more tables within your central table. Repeat the table creation process for each element you wish to add. For example, if you want to add a picture to one of your columns, creating a sub-table will allow you to place that image exactly where you want it without ruining the other table design elements.
When adding additional tables, it is important to also add an additional column for padding. Similar to the border padding, table padding allows your inserted element to have a defined space within the email. Think of a photo in the middle of a newspaper column, and how the words flow around it without the column turning into a zig-zag.
Best practices:
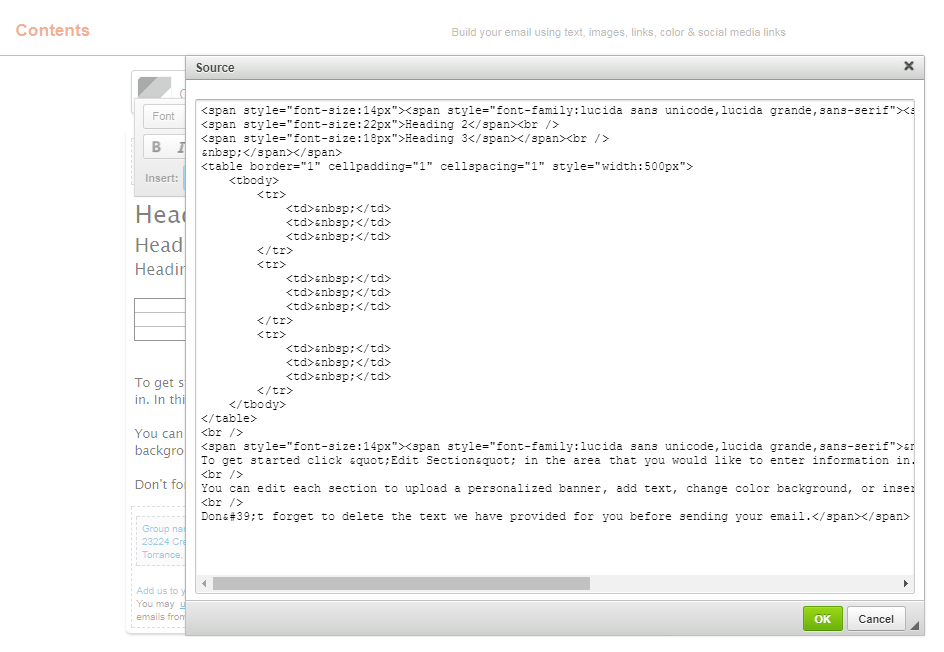
How to use HTML
If you prefer to build your email using HTML code, or to make edits directly to the source code, simply click on the HTML tab on the editor tool. This will bring up the HTML code for you to work in.
Note: You can tag your edited HTML code to easily locate the changes you make.
Best practice: If using a border, it’s a good idea to also add a padding column and row to your table. This should be set at 10 pixels. This padding will ensure your images and text don’t run into the border edges to create a visual mess.
How to use columns/additional tables
You can continue to modify the design of your email by adding more tables within your central table. Repeat the table creation process for each element you wish to add. For example, if you want to add a picture to one of your columns, creating a sub-table will allow you to place that image exactly where you want it without ruining the other table design elements.
When adding additional tables, it is important to also add an additional column for padding. Similar to the border padding, table padding allows your inserted element to have a defined space within the email. Think of a photo in the middle of a newspaper column, and how the words flow around it without the column turning into a zig-zag.
Best practices:
- Before adding images, resize them to 150 pixels. If you don’t have edit image software: Perform a browser search for “Image editor.” Any of the numerous, free results will guide you through editing your image to the correct pixel size.
- Be sure to select a font and to set a font size for the text of your content.
How to use HTML
If you prefer to build your email using HTML code, or to make edits directly to the source code, simply click on the HTML tab on the editor tool. This will bring up the HTML code for you to work in.
Note: You can tag your edited HTML code to easily locate the changes you make.
- Once you’ve added your table, right click on it and select, Table Properties
- Within the Table Properties window, select Advanced
- In the ID window, enter your tags
- Search for them from within the HTML editor window
Sending test copies to multiple email client servers is the best way to ensure that your email looks correct regardless of the recipient's email client. At least check recipients with a @gmail, @yahoo, and an @outlook email server to be sure you’ve hit the majority of recipients’ email clients.
Add a button to your email
Buttons provide a quick and easy way for your audience to access all kinds of content you create on memberplanet. Depending on the type of content, buttons offer different kinds of perks to your users.
Merge a Form Field into an email
This is perfect for sending a confirmation email for guests or registrants stating their registration preferences, like menu choice or plus one options.
Buttons provide a quick and easy way for your audience to access all kinds of content you create on memberplanet. Depending on the type of content, buttons offer different kinds of perks to your users.
- From within the email editor, place the cursor in the area of the email where you'd like to insert your button
- Click Buttons in the toolbar
- A popup window will appear with a dropdown menu of your button options; from the dropdown menu, select the type of button you want
- Click Go
Merge a Form Field into an email
This is perfect for sending a confirmation email for guests or registrants stating their registration preferences, like menu choice or plus one options.
- Open the editor for the Payment Form or Survey you want to merge fields from
- If you have not already, include the Email Address field on your form
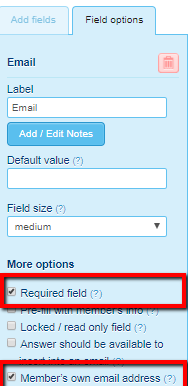
- Click on the Email Field on your form, the blue tab to the left will reveal Field Options
- Under More Options check the boxes Required Field and Member's own email address
Note: For each field you’d like to merge: click to highlight the field (revealing field options to the left), check Answer Should Be Available to Insert Into an Email.
Note: If the field is non-optional, be sure to also check Required Field box in addition to Answer Should Be Available to Insert Into an Email. If you don't make a field required some people may skip it and the merge tag space will be blank in their email.
Note: If the field is non-optional, be sure to also check Required Field box in addition to Answer Should Be Available to Insert Into an Email. If you don't make a field required some people may skip it and the merge tag space will be blank in their email.
Manage and Track Emails
Our email tracking functionality allows admins to monitor all sent emails and and manage drafts, as well as scheduled emails, in one area. Being aware of your tracking information allows you to know what is working and what isn’t, quickly. Use that information to help decide which emails become templates for later use.
Manage emails
- On the left navigation bar, hover over Emails
- Click on Manage Emails from the submenu
- Choose which of the following information tabs you want to view:

Sent: Explore details of emails you’ve sent. Click on the gear icon to reveal options for viewing, resending, copying, and deleting the email.
Drafts: View all the emails you’ve created, but haven’t sent.
Scheduled: Emails you’ve completed and set to be sent at a date/time in the future.
Tracking: View details about receipt details for emails you’ve previously sent.
Bounced: See a history of emails that were returned undeliverable. This includes recipient details, such as name and email address sent to.
Unsubscribe: View who has opted to receive emails from your group anymore. This includes recipient information and a comment section.
Spam: See which emails have gone to a member’s spam folder.
View Email Tracking
Email tracking allows you to view stats on all your emails sent from the platform. Search for the campaign name or select a date range. View whether your email was delivered, bounced, opened, clicked, unsubscribed or it went to the spam folder for all recipients. Tracking is incredibly useful not only in determining which emails are effective, but also in choosing whom to communicate with. For example, send another email to members who haven’t opened previously sent emails, or to those who haven’t clicked on a call to action, such as an RSVP link, to find out why. It also aids in determining why emails are bounced, or not able to reach the recipient due to incorrect email addresses, invalid recipient information, etc.
You also have the option to export data to an Excel spreadsheet by clicking the Export button.
Email tracking allows you to view stats on all your emails sent from the platform. Search for the campaign name or select a date range. View whether your email was delivered, bounced, opened, clicked, unsubscribed or it went to the spam folder for all recipients. Tracking is incredibly useful not only in determining which emails are effective, but also in choosing whom to communicate with. For example, send another email to members who haven’t opened previously sent emails, or to those who haven’t clicked on a call to action, such as an RSVP link, to find out why. It also aids in determining why emails are bounced, or not able to reach the recipient due to incorrect email addresses, invalid recipient information, etc.
- On the left navigation bar, click on Emails
- Click on the Tracking tab
You also have the option to export data to an Excel spreadsheet by clicking the Export button.

Glossary
Contacts: Contacts don’t have the ability to log in to the group, and can’t engage with the memberplanet community. They are only available to receive information sent to them by the group admin.
Smart List: a distribution list populated by running dynamic queries based on member actions and statuses. For example, Smart Lists can be created based on a group’s member levels, or those who’ve RSVP’d to an event.
Personalized text: an auto-populated element, such as name or email address, that is based on the individual recipient, and pulled from the member database section of your group. This allows each email recipient to receive a personalized email.
Button: a one-click element for quick access to payment forms, Donation Sites, surveys, and the join-the-group process.
Campaign name: the name of your email, which is not visible to recipients. For example, “April update” or “Spring Newsletter.”
Anchor: clickable text in a hyperlink for easy access to different parts of an email
Template: a pre-formatted email that you can replace with your own content so that you can quickly and easily create emails.

|
About memberplanet |
|


© 2020 memberplanet, LLC. ALL RIGHTS RESERVED.