Admin role management
These terms define how the platform rules work in relation to admin roles and permissions:
Full-access Admin: an admin with the ability to create, edit, and delete all information related to the group. There is at least one person within a group with this role, and it is initially assigned to the person who created the group. This is the only role wherein the permissions are not editable.
Admin: a person who has been assigned an administrative role within the group with view and/or edit permissions.
Role: a set of permissions defined by the full-access admin or another admin with role management permissions, and assigned to admins of the group.
Feature: a distinct service relating to a set of actions that can be taken on the platform.
Permissions: rules within each feature that determine whether an admin can only view items within that feature or whether they can also edit the items.
How Do I Create and Assign a New Admin Role?
Each group has at least one full-access admin. This role is initially assigned to the person who created the group. A full-access admin can assign this role to other admins as well as edit others’ permissions and roles. To help manage your organization, you can assign an unlimited number of admins and create an unlimited number of roles.
Important note: users with the full-access admin role (or the role management feature as part of their role) are able to remove roles from other admins, which could inadvertently prevent them from being able to manage the group. Do not assign the full-access admin role or the role management feature to anyone unless you want him or her to have the ability to revoke other admin’s roles.
6. Click the Save & Close button at the bottom
Each group has at least one full-access admin. This role is initially assigned to the person who created the group. A full-access admin can assign this role to other admins as well as edit others’ permissions and roles. To help manage your organization, you can assign an unlimited number of admins and create an unlimited number of roles.
Important note: users with the full-access admin role (or the role management feature as part of their role) are able to remove roles from other admins, which could inadvertently prevent them from being able to manage the group. Do not assign the full-access admin role or the role management feature to anyone unless you want him or her to have the ability to revoke other admin’s roles.
- On the left navigation bar, click on Admins
- Click the Add a New Role button on the top right
- Type the name of your role in the Role Name field
- Select the features you want the admin to have access to
- When selected, the permissions associated with the feature appears. The default permissions is set to Edit & View.
6. Click the Save & Close button at the bottom
Note: Membership is the only admin role with a third option besides Edit and View and Only View. This role has an Assign Offline Payments permission that can also be assigned.
How do I assign and edit an existing admin role?
How do I assign and edit an existing admin role?
- On the left navigation bar, click on Admins
- Select the gear icon for the role you’d like to assign or edit

- A dropdown menu of options will appear. Select the appropriate option from the menu to either assign or edit a role.
To assign the role:
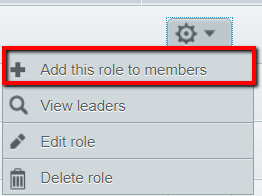
- Click on Add this role to members from the dropdown menu
2. Select which member or members to assign the role to
3. Click on Assign role to selected members in the bottom right to complete the process
To edit an existing role:
3. Click on Assign role to selected members in the bottom right to complete the process
To edit an existing role:
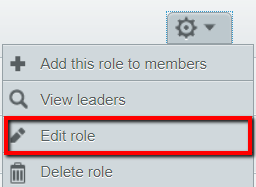
- Click Edit role from the dropdown menu
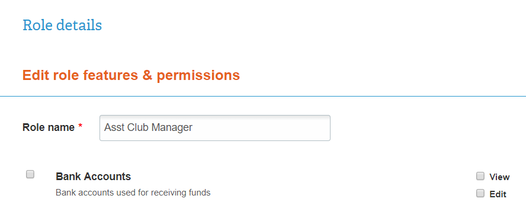
- You'll be taken to the Role Details page. Here you can change the role name, add or remove role features by
2. Click Save & Close at the bottom to complete the process
Manage Bank Access for Administrators
You can selectively allow or restrict individual administrators from accessing the bank account settings. This is a good option for groups with multiple administrators who want added security when managing payment processing.
Follow these steps to create an admin role specific to an admin’s bank access:
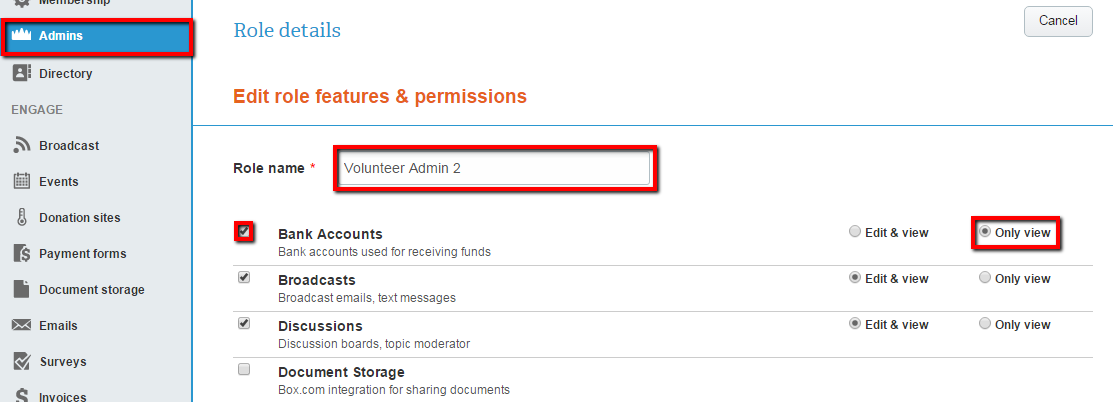
4. Select the checkbox next to Bank Accounts
You can selectively allow or restrict individual administrators from accessing the bank account settings. This is a good option for groups with multiple administrators who want added security when managing payment processing.
Follow these steps to create an admin role specific to an admin’s bank access:
- Select Admins on the left navigation bar
- Click the Add a New Role button on the top right
- Title your role name
4. Select the checkbox next to Bank Accounts
- When selected, the permissions associated with the feature appears. The default permissions is set to Edit & View.
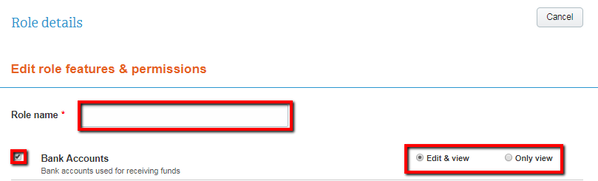
5. If you desire to only assign view permissions, select Only View
6. Click the Save & Close button at the bottom
7. On the same row of the role you created, click the gear icon
8. In the dropdown menu, select Add this Role to Members
9. Select the checkbox next to the member you wish to assign the role to
10. Click the Assign Role to Selected Members button at the bottom
Glossary
Full-access Admin: an admin with the ability to create, edit, and delete all information related to the group. There is at least one person within a group with this role, and it is initially assigned to the person who created the group. This is the only role wherein the permissions are not editable.
Admin: a person who has been assigned an administrative role within the group with view and/or edit permissions.
Role: a set of permissions defined by the full-access admin or another admin with role management permissions, and assigned to admins of the group.
Feature: a distinct service relating to a set of actions that can be taken on the platform.
Permissions: rules within each feature that determine whether an admin can only view items within that feature or whether they can also edit the items.

|
About memberplanet |
|


© 2020 memberplanet, LLC. ALL RIGHTS RESERVED.